 ). It would be back together by now but I'm soaking the diaphragm housing which seems rusted or sealed in. I remember it sticking in past rebuilds but not this firmly stuck... Now if I had only remembered that my wife told me not to rebuild the carb at the kitchen table a few months ago I wouldn't be in the dog house!
Saturday, March 23, 2013
What To Do When You're Housebound
Sitting around the house on yet another below 40 degree early spring day and feeling anxious and I realized what was up... I needed to get my hands a little dirty and get back to rebuilding the carb that I started taking apart back in probably December. Luckily I remembered how most of it went back together, but then my friend Doug's excellent rebuild guide, filled in the other 75%! (Especially how the needle float and float pin went back in because I dumped my new one out of the bag and they spilled out jumbled from the needle seat!) Thanks for the excellent writeup and photos (which I really didn't take enough of... ). It would be back together by now but I'm soaking the diaphragm housing which seems rusted or sealed in. I remember it sticking in past rebuilds but not this firmly stuck... Now if I had only remembered that my wife told me not to rebuild the carb at the kitchen table a few months ago I wouldn't be in the dog house!
). It would be back together by now but I'm soaking the diaphragm housing which seems rusted or sealed in. I remember it sticking in past rebuilds but not this firmly stuck... Now if I had only remembered that my wife told me not to rebuild the carb at the kitchen table a few months ago I wouldn't be in the dog house!

Monday, September 24, 2012
Small Steps
Yay, small steps! I finally got around to ordering the replacement pressure plate bolts from Walck's a couple of weeks ago. Got a UPS tracking number and I noticed that the shipping weight listed it as 10 pounds!? Huh, for six bolts, lock washers and a keychain? Oh well, got the box last week and its huge and HEAVY! I open it up and yup, its a whole pressure plate! Got in contact with his wife this past weekend and she sent the bolts out which I got today and pre-paid packing slip to mail back the plate which I did today.
Spent a few minutes out in the barn with one of my sons and now have the clutch and pressure plate re-attached. Now, I just have to find what I did with four missing bellhousing bolts and I'll be back on my way with things!
Saturday, September 8, 2012
An "Easy Out"
Slow progress/ no progress... Forgot to post that last week I did get that broken bolt out. I bought an easy out set that seemed to have alot of recommendations as well as being an American made product, from Alden. They make a line of easy outs for both bolts and screws. They seem to roughly all work the same way. One end of the bit cuts a centering hole and then you switch it around and the other end acts as the reversed thread shank that cuts and grips the bolt to pull it out. You get the idea...
Anyways, bought a set and I started to cut into the bolt just to find out that the pressure of the cutting end was enough to back it out enough that I easily got a pair of pliers onto it and unthreaded it... :?
To have gotten a grade 8 bolt to snap off I thought that the bolt would have been too torqued in there to get it to unthread that easily otherwise I would have tried it. Oh well, live and learn. I still have to get a new set of bolts from Walck's before I get to start over again with the clutch!
Saturday, August 18, 2012
A Lesson Learned...
So I also need to invest in something better than my little old tap and die set. Anyone have a recommendation for a good quality, preferably American made set? Or should I be looking for a thread chasing set or re-threader set?
Yep, I learned a lesson today! Like I said, I thought to myself on the third turn, why is this bolt so loose? At the end of the fourth turn I knew that it hadn't been loose at all... But with that extra leverage provided by the long handle I hardly knew how hard I was torquing it. Wish that I had been using my old needle type wrench... lesson learned, I guess...
Yep, I learned a lesson today! Like I said, I thought to myself on the third turn, why is this bolt so loose? At the end of the fourth turn I knew that it hadn't been loose at all... But with that extra leverage provided by the long handle I hardly knew how hard I was torquing it. Wish that I had been using my old needle type wrench... lesson learned, I guess...
One Step Forward And Two Back
One step forward and two back today, man am I bummed... :(
But first the good news- I spun the pilot bushing on the end of a taped up bit on my drill and ran the bushing over some sandpaper and took a few thousandths and lo and behold it went in easily with a rubber mallet and a few more gentle taps from a sledge.
Torqued down the flywheel and cleaned and repainted the T90's metal mount and got the old transfer case mount out of the crossmember. I was on a roll! Decided to clean up the pressure plate and put in the clutch. I was just about to call it a day while I torqued the bolts... The third bolt seemed to either be loose or had alot of slack in it and just before the message got through my thick head that I should stop because the torque wrench wasn't clicking... snap... sheared a bolt off in the flywheel. :(
Got a bit too eager. I should have stopped and replaced the old bolts. Instead I was using the old pressure plate bolts. Probably didn't have anything to do with it though. With all the reach of the torque wrench it put too much on the bolt... Just don't know why it didn't click.
So.... now I have to replace my old drill as it's shot and try to drill out the bolt... it didn't even have the decency to snap off with any thread showing so I could have tried to get it out with a wrench...
Sunday, August 12, 2012
Another Sunday...
Didn't get much done today, still too damned humid to feel like moving. Tried tapping in the pilot bushing after taking it from the freezer... Hmmm... short of using a press (which I don't have...) anyone have any creative solutions for driving a new one in? I've tried using the input shaft as a guide but still manage to start pushing it in cockeyed. I mean they're pretty cheap but I'd rather not damage it too badly before I get it back in the flywheel. Comparing the old one to new slid onto the shaft you can feel some very slight... like 1/64" slop but its enough that I'm glad that I replaced it... well trying to replace it!
Still bashing away at the collar of the old transfer case mount now painted within the crossmember mount. I've got it started to separate with a chisel and punch, but that sucker is still firmly seated. So after losing a pound or so in sweat I decided to call it a night.
Monday, August 6, 2012
Wrestling With A Flywheel
Another scorcher today that really sapped my drive. Got a bit done though... Cleaned up the flywheel to look nice and purty with a bit more degreaser and then tried the unconventional 150 grit sandpaper and random orbital sander on it. Didn't go crazy with it, just got her nicely buffed and shiny. Took off the stubborn bits of grease.
Popped out the pilot bushing easily enough using the grease and input shaft trick...
I wasn't convinced that it was going to work, but wow, was I surprised! I'm freezing the new one and then I'll try tapping it in with the end of the input shaft again unless anyone has a better idea?

The aforementioned 'SP' initials on the front oil pan facing side of the bellhousing shield.

Pretty sure that it isn't a random set of scratches... who knows who 'SP' was!


Anyone know what this could have been or where it came from? It looks like a rounded lock washer with pointed ends... I found it somewhere near the rear of the engine after removing the clutch.

Closer view...

Lastly... I went to set the transfer case mount in today as well and discovered that it didn't fit. Looks like when I was cleaning up the old deteriorated one I left the old bottom metal seat of the old one in its cup in the crossmember. I remember scraping out the rubber from this cup when I was first cleaning up the frame, but that was all that came out. Just wanted to make sure before I start to chisel this piece out.
Saturday, July 28, 2012
The Summer Of 2012 So Far
A bunch of new entries all compressed into one for the months of June and July. Its all taken from forum entries so it asks questions and then answers them as I've figured them out. I ordered a bunch of parts from Walck's that I hope will enable me to get a rolling chassis back together by the fall!
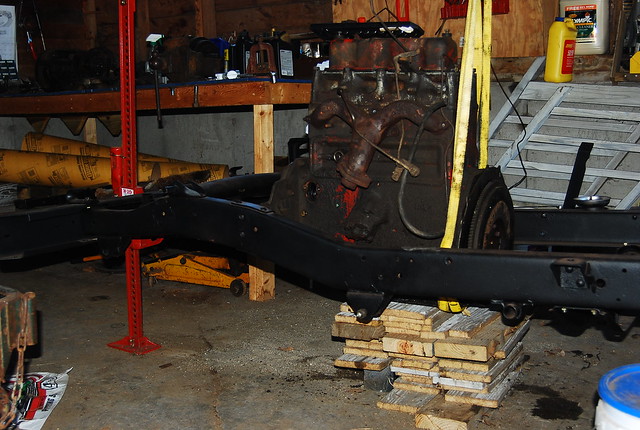
How the Mistress is currently sitting, engine propped up on scrap lumber and on her engine mounts.
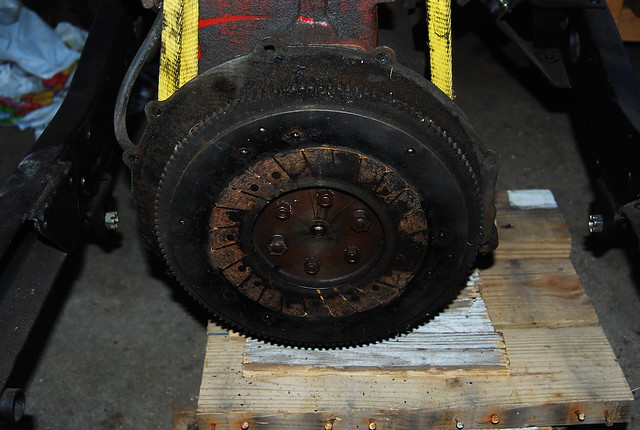
Back of the flywheel. What's involved with cleaning this up? Some light grit sandpaper for the rust spots left by the disc and degreaser? Other than the 'ghost' image left by the clutch disc, it seems in good shape, not obviously worn down or glazed, all teeth intact...
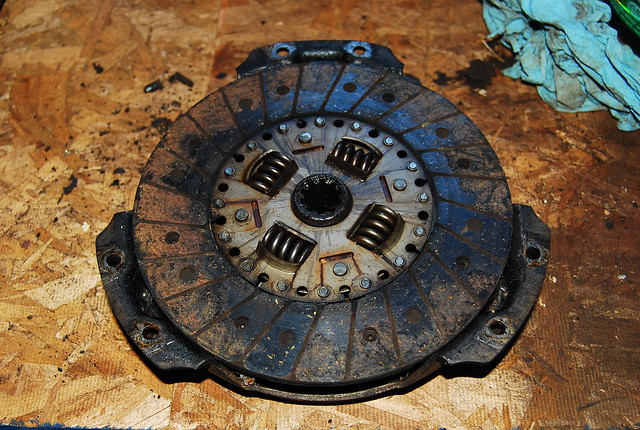
Flywheel side of the clutch disc, some wear, but I am not sure how much is too much. It DOES have a bit of grease and schmutz on it, so maybe I should just replace it?
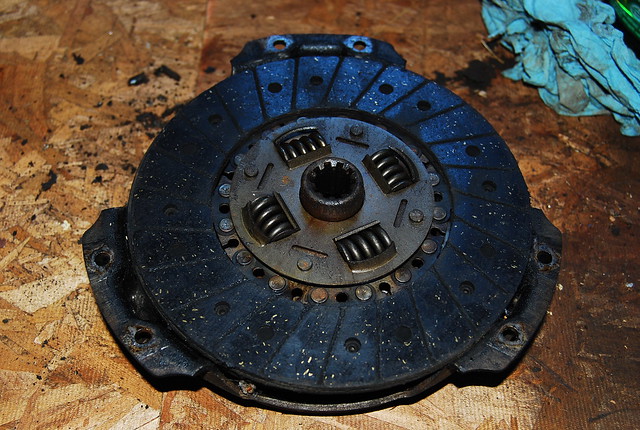
Pressure plate side, again, not much wear.
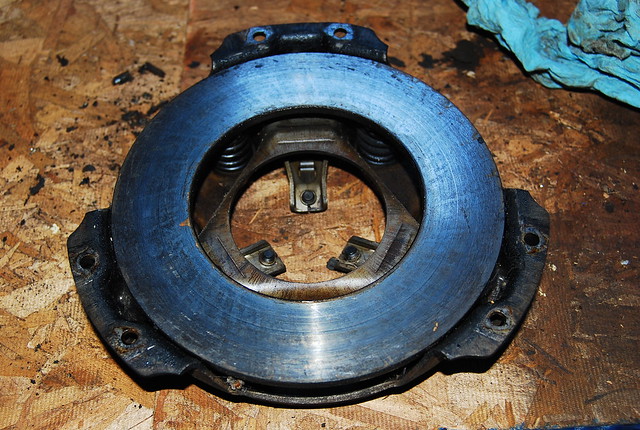
Pressure plate. Looks good to me. The three fingers all work smoothly and are hopefully adjusted fine.
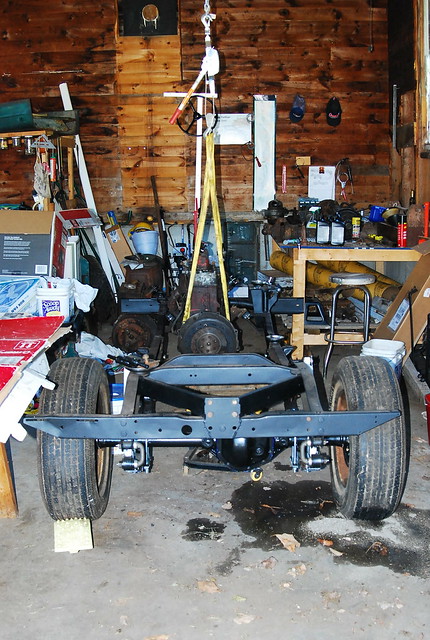
Rear view.
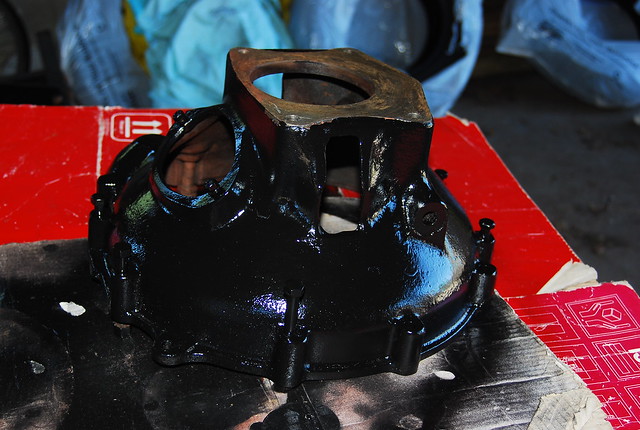
And the bellhousing that I spent some time degreasing and scraping a pound of dirt and grease from before painting.
I may as well replace the pilot bearing while I'm at right, right? And the throwout bearing seems to move pretty smoothly, but probably just another replaceable part?
So, been giving this alot of thought lately and here's roughly what I hope to accomplish this summer/fall.
First off, the Mistress is sitting on her rear axle with the engine on blocks in the rear and on the mounts in front.
I need to do the following:
1) Finish disassembling the T90, clean the accumulated 1-2" of solid dirt, mud and grease from the case, rebuild and paint it.
2)I also took the flywheel off today to try and figure out if there's an easier way of getting the front crankshaft pulley nut off without an impact wrench. I actually have a cheap-o HF one, but after a couple of uses it's broken... figures... Wish that I could afford a decent Milwaukee or something but not right now. How much can you reasonably expect to degrease a flywheel? I mean, mine isn't covered in grease where the clutch disk touches, but the exterior of that is sorta sticky to the touch like old, old dried grease has been flung up and sullied it up over the past 60 years. Other than that it isn't scored up nor does it look really bad, but should it be ground down at all? Also need to get the pilot bushing replaced using the old grease method, change the clutch and throw out bearing.
3) In general I need to scrape and degrease and eventually paint the entire engine. After that a general tune up is in order, rebuild the carb and get all the other misc. plumbing done for fuel and oil lines.
I'll need to take care of the broken studs on the exhaust manifold and I may even try it myself once I get a decent corded drill and a few new taps. My old Dewalt cordless needs its brushes replaced (I think... screeches like a banshee if you do anything other than drill a simple hole in soft wood...) I'm inspired by this writeup and I think that I can do it if I take my time with it. Otherwise I think that a startup of the engine can manage with the manifold as it is if I can get the old section of exhaust pipe out of the manifold's flange until I get to the repair and new studs. It seems pretty solidly attached to the block but who knows if there is or isn't a leak there.
Then I have to pull the head and hopefully get it all torqued down correctly. The two bolts in either corner aren't flush with the top of the head and I'm hoping that Bubba didn't try to replace two of the head bolts with two slightly longer bolts. The top of the head is also covered with some old foul oil in small pools. Bad rings or guides? Guess that I'll check compression when I can as well and possibly do a ring job with the engine installed.
4) As soon as I get the T90 back in place and the the transfer case degreased, rebuilt and painted (and with hopefully no new parts needed other than the basic gasket and oil seal set that I ordered) I need to pull the oil pan and check out the pick up, clean out the sludge and cross my fingers that the crank looks good and there isn't any other obvious damage internally. It all turns normally, the rockers all move as they should and I'm hopeful.
5) Then its a small job of getting the springs and front axle and shocks back together and the Mistress should be rolling on two tires that hold air and two that don't! And then after the fuel and oil lines, radiator (which hopefully holds water well!) and maybe even brakes (of which there was nothing to salvage but the backing plates... can't even rebuild the wheel cylinders... I hope that I 'll be able to rebuild the master though...) then I should have a rolling chassis that I can possibly drive around thew driveway!
6) Then its *only* a matter of patching up the body, the wiring, the brakes and lines, lights, new fuel tank, seat padding, new tires, gauge repairs and I'll have a street legal jeep! :D
First off, the Mistress is sitting on her rear axle with the engine on blocks in the rear and on the mounts in front.
I need to do the following:
1) Finish disassembling the T90, clean the accumulated 1-2" of solid dirt, mud and grease from the case, rebuild and paint it.
2)I also took the flywheel off today to try and figure out if there's an easier way of getting the front crankshaft pulley nut off without an impact wrench. I actually have a cheap-o HF one, but after a couple of uses it's broken... figures... Wish that I could afford a decent Milwaukee or something but not right now. How much can you reasonably expect to degrease a flywheel? I mean, mine isn't covered in grease where the clutch disk touches, but the exterior of that is sorta sticky to the touch like old, old dried grease has been flung up and sullied it up over the past 60 years. Other than that it isn't scored up nor does it look really bad, but should it be ground down at all? Also need to get the pilot bushing replaced using the old grease method, change the clutch and throw out bearing.
3) In general I need to scrape and degrease and eventually paint the entire engine. After that a general tune up is in order, rebuild the carb and get all the other misc. plumbing done for fuel and oil lines.
I'll need to take care of the broken studs on the exhaust manifold and I may even try it myself once I get a decent corded drill and a few new taps. My old Dewalt cordless needs its brushes replaced (I think... screeches like a banshee if you do anything other than drill a simple hole in soft wood...) I'm inspired by this writeup and I think that I can do it if I take my time with it. Otherwise I think that a startup of the engine can manage with the manifold as it is if I can get the old section of exhaust pipe out of the manifold's flange until I get to the repair and new studs. It seems pretty solidly attached to the block but who knows if there is or isn't a leak there.
Then I have to pull the head and hopefully get it all torqued down correctly. The two bolts in either corner aren't flush with the top of the head and I'm hoping that Bubba didn't try to replace two of the head bolts with two slightly longer bolts. The top of the head is also covered with some old foul oil in small pools. Bad rings or guides? Guess that I'll check compression when I can as well and possibly do a ring job with the engine installed.
4) As soon as I get the T90 back in place and the the transfer case degreased, rebuilt and painted (and with hopefully no new parts needed other than the basic gasket and oil seal set that I ordered) I need to pull the oil pan and check out the pick up, clean out the sludge and cross my fingers that the crank looks good and there isn't any other obvious damage internally. It all turns normally, the rockers all move as they should and I'm hopeful.
5) Then its a small job of getting the springs and front axle and shocks back together and the Mistress should be rolling on two tires that hold air and two that don't!
And then after the fuel and oil lines, radiator (which hopefully holds water well!) and maybe even brakes (of which there was nothing to salvage but the backing plates... can't even rebuild the wheel cylinders... I hope that I 'll be able to rebuild the master though...) then I should have a rolling chassis that I can possibly drive around thew driveway!6) Then its *only* a matter of patching up the body, the wiring, the brakes and lines, lights, new fuel tank, seat padding, new tires, gauge repairs and I'll have a street legal jeep! :D
Ok, I finally had the time to start with tearing into the T90 today and it came apart (mainly...) as slick and simple as butter... that is once I took a better look at things and took my time. That problem that I was having with the main shaft was due to not having taken out the two bolts for the oil collector. Once that was done the countershaft came out easily, dropped the cluster gear and with a little finagaling with the oil collector the main shaft came right out! Between Doug's write-up and this one- http://www.cj-3a.com/T-90%20Rebuild.htm by Rick Stivers its all started to make some sense. I ran into a bit of trouble with having to remove some washers from the end of the cluster gear in order to be able to move it around a bit more so that I could get the oil collector out and then the mainshaft. Now for the big problem, the reverse idler gear shaft... I'm using a 3/4" wooden dowel instead of a brass punch but I cannot for the life of me figure out how to drive it out. You cannot get at it in a straight line and I've tried the C-clamp idea that Stivers suggests too, but so far, nothing... Wish me luck with a bit of sleep tonight that I may have more luck with it.
A friend of mine on my forum suggested a 1/2" socket extension and I'll be damned if it didn't work perfectly. I tapped it a few times and moved it about 1/8". I was hesitant about moving it out the rest of the way with the extension as I didn't want to cock it and jam it by hammering on it at an angle. It came out the rest of the way with the dowel as easily as the countershaft. Just a matter of getting it started as the original idea man had said!
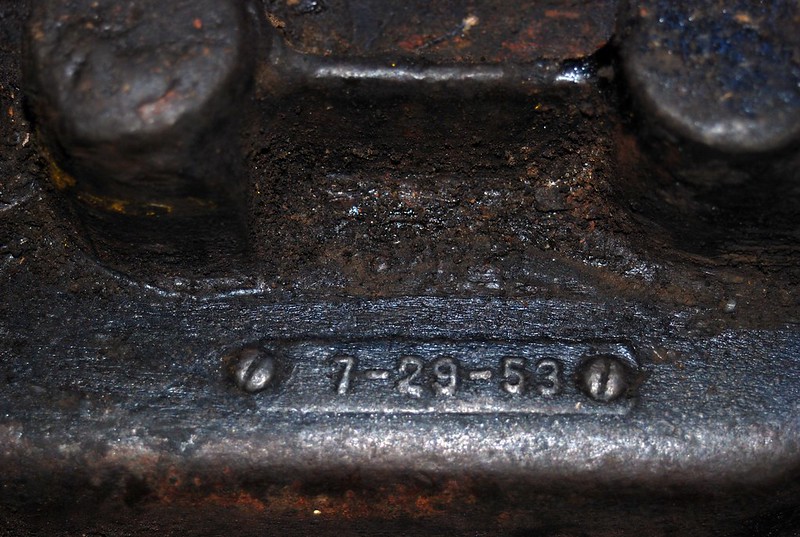
I started getting alot of work done on the T90 today and one of the gems that I uncovered was the original casting date for the case... July 29, 1953! How about that!?! A week from today it was cast 59 years ago! Pretty cool! I love dates on things like this and was hoping to find some frame numbers when I cleaned up the frame, but this almost makes up for it. I didn't know that these existed until I chanced across a reference to it on the 2A Page here. As the OP said, the fake screwheads are a nice touch!
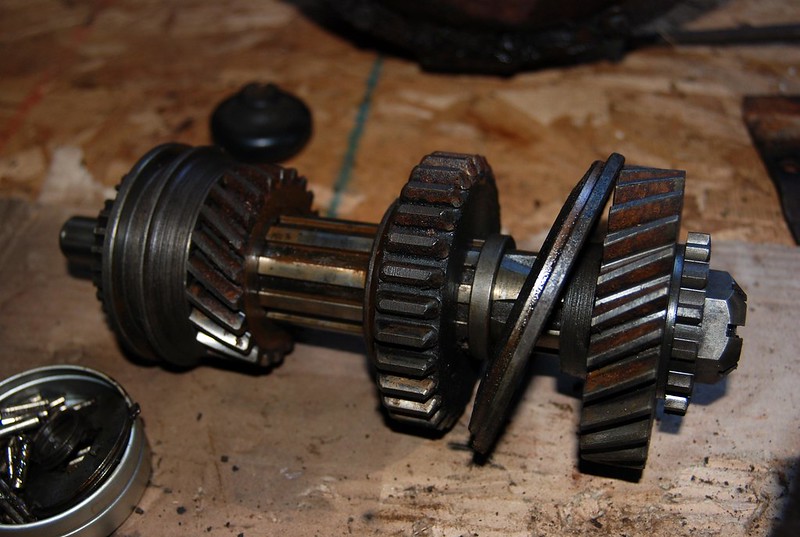
The mainshaft gears. Mainly a bit of surface rust but you can see some wear on the large gear's right hand teeth on the sliding gear or the 1st/Reverse Sliding Gear as Stivers refers to it here- http://www.cj-3a.com/T-90%20Rebuild.htm. I think that it's related to the excessive wear on the countershaft/ cluster gear set.
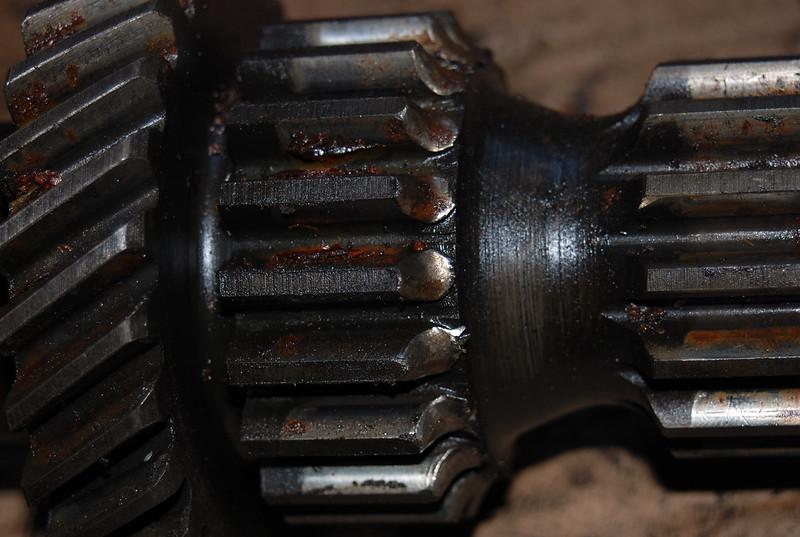
And speaking of which...
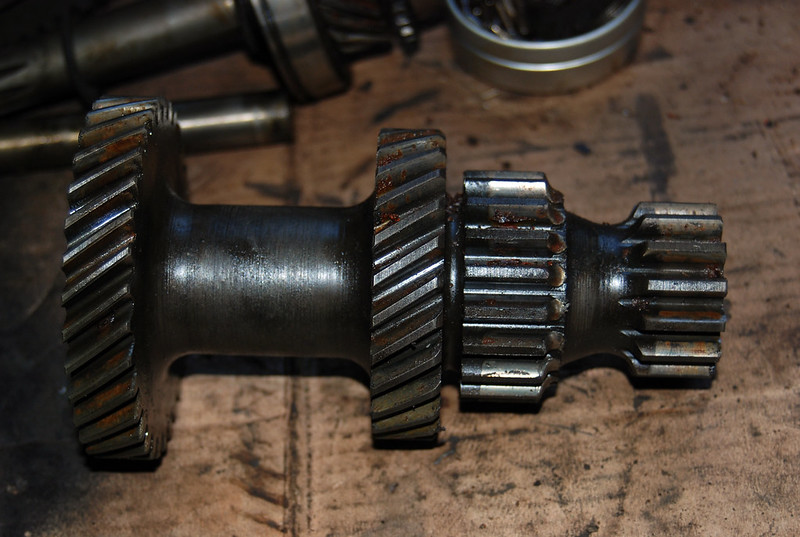
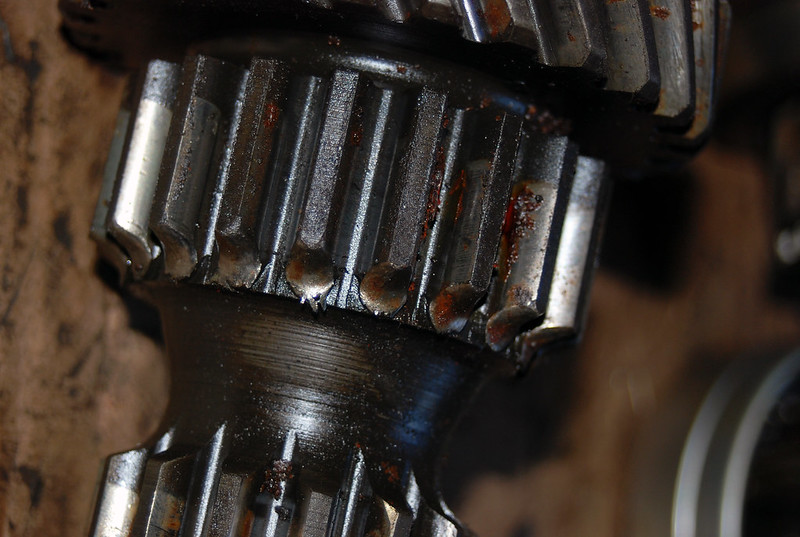
Anyone have any experience with how much wear is too much. Stivers says 3/8"... Guess that its time to break out the file and dress 'em up a bit.
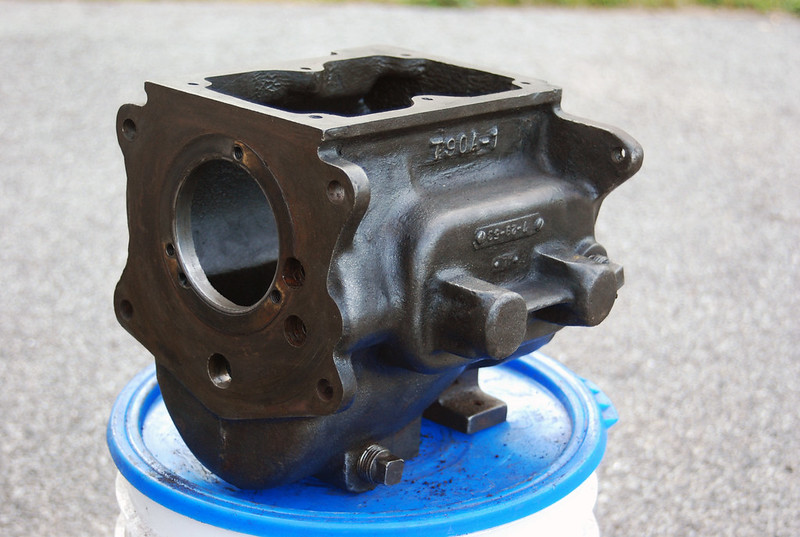
Got nice and dirty with the grinder and wire wheel. Its messy but does a nice and quick job of thick accumulated grease and dirt. A bit of Simple Green and a couple of shop rags later and its looking almost ready for paint! Still gotta get into the corners and niches with an old toothbrush and then it'll be Rustoleum time!
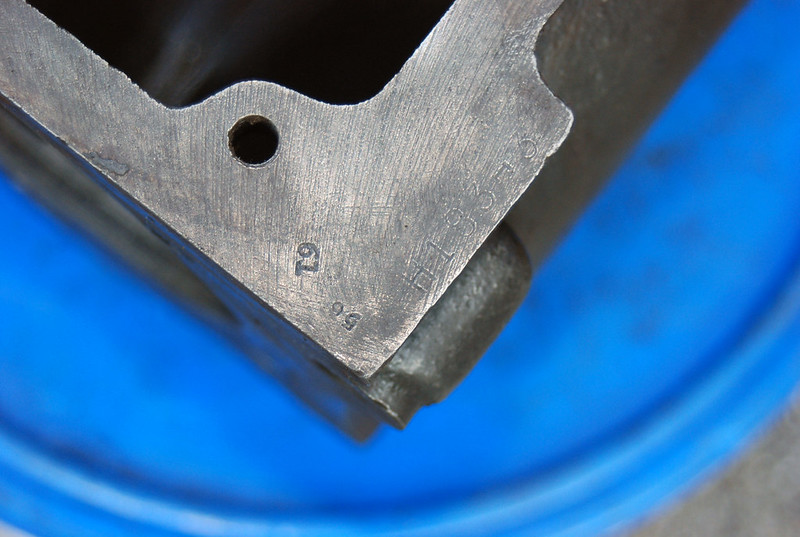
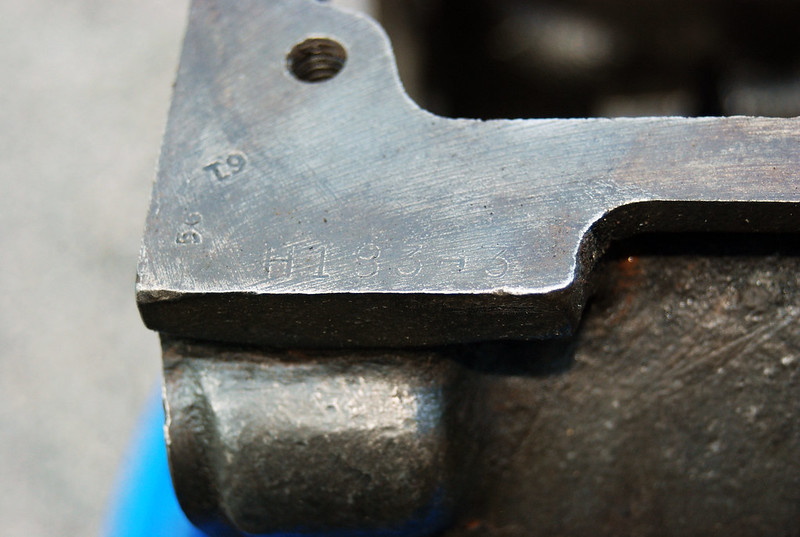
And another little mystery. Anyone have an idea about the stamped numbers on the lip of the top plate? "56", "61" and "H183-3"
Sunday, September 25, 2011
Back On Her Rear Again!
Well I finally got around to ordering those shocks and while I need to do another parts order, I am on my way. The Mistress is sitting on her rear axle and old tires again! It all went pretty smooth and I have my friend Doug to thank for the spring pivot bolts! The engine needs to be cleaned up and painted and a tune up done to it and then to tear into the front axle which is now sitting on the jack stands where the 44 was not too long ago. I'm going to keep my fingers crossed that the donor engine is well enough to run as the PO had stated and will be good enough with just a carb rebuild and tuneup stuff done to it. I plan on removing the pan when I have the engine cradled back in the frame and checking out the pickup screen. And I can always do a ring job in chassis if need be, so here's to hoping!


Tuesday, July 12, 2011
I found a cheap source for shocks, $10 each for Monroes! Its honestly held me up not being able to afford $100 for a complete set. I've bought parts for my TJ and the Lib from RockAuto.com before but never thought to check them as an alternative source for the Mistress. They actually have alot of stuff and I was pleasantly surprised by the price for the shocks. Now to scrape up the $40 for these, paint and scrape the backing plates and I'm getting closer to a rolling chassis!
Monday, June 27, 2011
Axle Shafts Pulled
Little more done today. Pulled the axle shafts using the old using the drum as a slide hammer technique. The shafts, bearings and cups look pretty good, so clean them up a bit and repack them and stuff them back in.

Managed to loosen the pinion shaft nut with a bit of ingenuity and an old leaf spring, but still confused as to whether the pinion shaft oil seal is there? Is this it pressed in? The only things that came off were the nut, (missing a washer...), the pinion yoke and the dust shield which sits on there very loosely and rattles around.


Managed to loosen the pinion shaft nut with a bit of ingenuity and an old leaf spring, but still confused as to whether the pinion shaft oil seal is there? Is this it pressed in? The only things that came off were the nut, (missing a washer...), the pinion yoke and the dust shield which sits on there very loosely and rattles around.

Sunday, June 5, 2011
More accomplishments
More progress and more questions! I splurged on a hub puller as I decided that I'd need it in the future as well so oh well, about one third of my parts budget but its a nice made in the USA hunk of metal. I pulled the hubs and it was amazingly easy. I had heard horror stories of them being a bear to remove and practically exploding off the axle shafts when they released all that stuck on energy. Mine just walked right off. I haven't tried removing them yet, but I'm assuming that the keys in them just pop right out?

In the process and...

Off!
I also notice that both hubs have grooves and a ridge that form tapers in them. Is that normal or is this wear? the axle shafts are supposed to be tapered and hoping that the hubs do too.

The driver's side had alot of old gear oil/grease that had dried to a molasses like consistency just on the axle castle nut and tip of the axle shaft. There was also evidence of a slow leak that attracted a ton of brake dust that collected on the backing plate. On the up side, the bolts holding the backing plate on were nicely lubricated and came off easily unlike the passenger side. As I got first the passenger and then driver's side off I noticed two things.
One: there were no lock washers on the bolts holding the backing plate on on the L side unlike the opposite side and
Two: that the order of the attaching hardware was different on each side. L. side= thin conical dust shield, thicker cone shape plate, flat plate, brake backing plate and three shims. The R side where there was no evidence of a leak had thin conical dust shield, then brake backing plate, THEN thicker cone shaped plate, flat plate and three shims. I'm guessing that someone took it apart and replaced things incorrectly? Just tried checking an old service manual and Moses Ludel's book but does anyone have the correct order?
And do I have to pull the axle shafts to get to those first bearings, the ones that are lubricated by the grease fittings on the outside of the axle tube?

Also took a pic of the finished radiator and fan guard. No, its not painted white, just the glare...


Finished assembling the last one of Nate's springs (thanks again Nate!) and ground down and painted the spring perches.
And this is what we have left...


In the process and...

Off!
I also notice that both hubs have grooves and a ridge that form tapers in them. Is that normal or is this wear? the axle shafts are supposed to be tapered and hoping that the hubs do too.

The driver's side had alot of old gear oil/grease that had dried to a molasses like consistency just on the axle castle nut and tip of the axle shaft. There was also evidence of a slow leak that attracted a ton of brake dust that collected on the backing plate. On the up side, the bolts holding the backing plate on were nicely lubricated and came off easily unlike the passenger side. As I got first the passenger and then driver's side off I noticed two things.
One: there were no lock washers on the bolts holding the backing plate on on the L side unlike the opposite side and
Two: that the order of the attaching hardware was different on each side. L. side= thin conical dust shield, thicker cone shape plate, flat plate, brake backing plate and three shims. The R side where there was no evidence of a leak had thin conical dust shield, then brake backing plate, THEN thicker cone shaped plate, flat plate and three shims. I'm guessing that someone took it apart and replaced things incorrectly? Just tried checking an old service manual and Moses Ludel's book but does anyone have the correct order?
And do I have to pull the axle shafts to get to those first bearings, the ones that are lubricated by the grease fittings on the outside of the axle tube?

Also took a pic of the finished radiator and fan guard. No, its not painted white, just the glare...


Finished assembling the last one of Nate's springs (thanks again Nate!) and ground down and painted the spring perches.
And this is what we have left...

Sunday, May 15, 2011
A Bit Of Spring Work
FINALLY got some work done today! Worked on Nate's springs (thanks again, Nate! :D) pulling them apart and wire wheeling them down for paint.


I had already used some epoxy putty on the radiator bracket and it seems to be holding up pretty well. I need to fill in some of the gaps once I get more putty. I used one tube on it and had to work pretty quickly to get it all in place before it set up, so that's why I have places to fill in yet.

And did some more grinding and cleaning on the rear axle. I'm going to fill in that odd sheet metal screw hole and the aforementioned rosette weld pinholes with some epoxy and then get to painting. I still have to yank out the old shoes and clean up the backing plates.
Also need to ask about the rear output. There's a circular "collar" that is loose and gear oil has leaked out of the output shaft area when the axle wasn't supported on the jackstands and hung straight down so I wasn't too worried about it, but does this mean I need to replace the seal?

The current state of the mess... uh, I mean, Mistress and the barn that needs a spring cleaning badly! :D
So I'm that much closer to getting a rolling chassis done. Just need to pick up some small parts from Walck's and diagnose the condition of the front axle. How do you determine the shape of kingpin bearings? Do the old 12 and 6 o clock grab and pull to see if there's any slop like ball joints?


I had already used some epoxy putty on the radiator bracket and it seems to be holding up pretty well. I need to fill in some of the gaps once I get more putty. I used one tube on it and had to work pretty quickly to get it all in place before it set up, so that's why I have places to fill in yet.

And did some more grinding and cleaning on the rear axle. I'm going to fill in that odd sheet metal screw hole and the aforementioned rosette weld pinholes with some epoxy and then get to painting. I still have to yank out the old shoes and clean up the backing plates.
Also need to ask about the rear output. There's a circular "collar" that is loose and gear oil has leaked out of the output shaft area when the axle wasn't supported on the jackstands and hung straight down so I wasn't too worried about it, but does this mean I need to replace the seal?

The current state of the mess... uh, I mean, Mistress and the barn that needs a spring cleaning badly! :D
So I'm that much closer to getting a rolling chassis done. Just need to pick up some small parts from Walck's and diagnose the condition of the front axle. How do you determine the shape of kingpin bearings? Do the old 12 and 6 o clock grab and pull to see if there's any slop like ball joints?
Sunday, April 10, 2011
Another Day...
Little bit done today. I gotta start taking some photos soon! Tested out some JB Weld that I picked but it wasn't thick enough to work well with filling the cracks ion the steering wheel. It had more of a pasted consistency and I need to find something that's a putty. But I did use use it to try to plug up what may develop into leaks from where the PO had screwed in three sheet metal screws into the fins trying to hold on the side bracket. Got the bracket and radiator sandpapered and cleaned up while I try to figure out if I can putty it on or try soldering it.
Painted the rear springs and put them back together, did a little more degreasing and wire wheeling on the rear axle, painted the cover for laughs... like I said not alot but it was something. Not alot more can be done until I order parts.
Painted the rear springs and put them back together, did a little more degreasing and wire wheeling on the rear axle, painted the cover for laughs... like I said not alot but it was something. Not alot more can be done until I order parts.
Sunday, March 27, 2011
Well I found a couple of hours to start a few things out in the barn. Managed to drive out the last of the bushings from the rear springs...now I just have to wait for warmer weather to paint!
Also started to clean up the rear axle with the grinder and a wire cup brush... found the 43/8= 5.38 gear ratio tag too and a few things that I cannot figure out.

Anyone know what the screw is threaded into the axletube on the far left? Just curious about the band too that is on the far right near the joining of the tube and the diff housing.


So, here I am clearing away clods of 50 year old grease and dirt and these bubbles appear. One is on the top right and the other is on the bottom left of the diff housing. They look like a bubble in a weld that the grinding uncovered. I don't think that they go through the housing. At least I don't think that I could have done it with over zealous grinding.
Lots more cleaning to go before I paint. My 5 year old was fascinated with watching the gears turn when I removed the cover. He thought that they were really "cool!"
In other news, the front springs are toast... after wasting time on them and deciding to just try and replace the hardware both sides of the main leaf eye holes splintered off as the original bushings had worn completely through and the shackles continued eating into the leaf... Luckily a friend of mine is giving me his old springs! Got a crazy expensive quote for re-arching... 135 bucks... apiece! may as well buy new springs at that rate!
I also finished painting the draw bar in that spell of nice 60 weather we had a few weeks back and I'm hoping for a rolling (driveable?) chassis by this fall... keep your fingers crossed!
Also started to clean up the rear axle with the grinder and a wire cup brush... found the 43/8= 5.38 gear ratio tag too and a few things that I cannot figure out.

Anyone know what the screw is threaded into the axletube on the far left? Just curious about the band too that is on the far right near the joining of the tube and the diff housing.


So, here I am clearing away clods of 50 year old grease and dirt and these bubbles appear. One is on the top right and the other is on the bottom left of the diff housing. They look like a bubble in a weld that the grinding uncovered. I don't think that they go through the housing. At least I don't think that I could have done it with over zealous grinding.
Lots more cleaning to go before I paint. My 5 year old was fascinated with watching the gears turn when I removed the cover. He thought that they were really "cool!"
In other news, the front springs are toast... after wasting time on them and deciding to just try and replace the hardware both sides of the main leaf eye holes splintered off as the original bushings had worn completely through and the shackles continued eating into the leaf... Luckily a friend of mine is giving me his old springs! Got a crazy expensive quote for re-arching... 135 bucks... apiece! may as well buy new springs at that rate!
I also finished painting the draw bar in that spell of nice 60 weather we had a few weeks back and I'm hoping for a rolling (driveable?) chassis by this fall... keep your fingers crossed!
Sunday, May 30, 2010
The Frame Is Done, For Now...


The TJ bumper isn't pretty and not a 'perfect' fit, but OK for now until I can afford a real bumper.


Subscribe to:
Posts (Atom)

